FabFilter Pro-R 2 online help
Table of contents
Go to sectionFabFilter Pro-R 2 Help
Introduction
Using FabFilter Pro-R 2
Full Screen mode, resizing and scaling
Presets
Purchasing FabFilter Pro-R 2
Support
Surround and Dolby Atmos
FabFilter Pro-R 2 supports all important surround/immersive audio formats, up to 9.1.6 Dolby Atmos (depending on the DAW and plug-in format). When you add Pro-R 2 to a surround channel, the interface automatically adapts itself to the used multi-channel format. The output level meter will show all channels, with appropriate labels to identify them.

Speakers and stereo placement
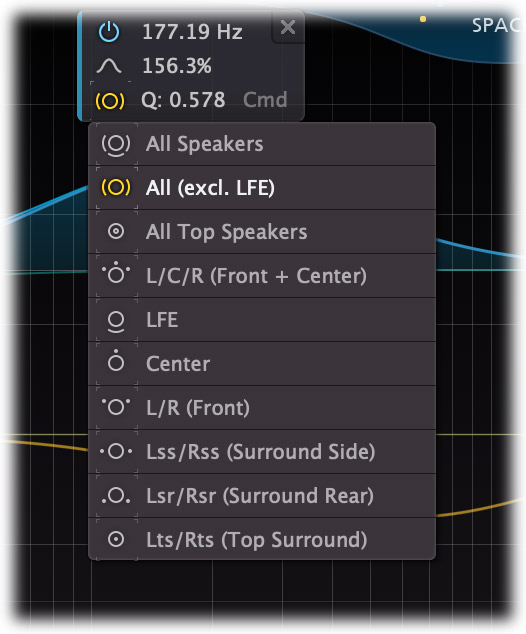
When using Pro-R 2 in surround mode, the parameter value display for the Decay Rate and Post EQ curves will show a Speakers button in the left-bottom corner, controlling which speaker sets and channels will be affected by a curve.
The drop down menu shows a list of the available speakers sets/pairs in the current surround channel layout. By default, all speakers are selected except the LFE channels: "All (excl. LFE)". You can choose any specific speaker pair here, e.g. Lss/Rss (Surround Side), or a predefined set of speakers, like "All Tops" or "L/C/R (Front + Center)".
For Post EQ curves, the menu will additionally show Stereo Placement options. By default, this is set to "Stereo", which means that both L and R channels of the selected speakers will be affected. You can change this to process only the left, right, mid or side information. In combination with the Speakers setting, this lets you target specific speakers in the channel layout.
The combination of these options offers a flexible way of customizing reverb response in your virtual space. You can easily make all top speakers less bright, or make rear speakers decay longer. The possibilities are endless.
Surround Settings
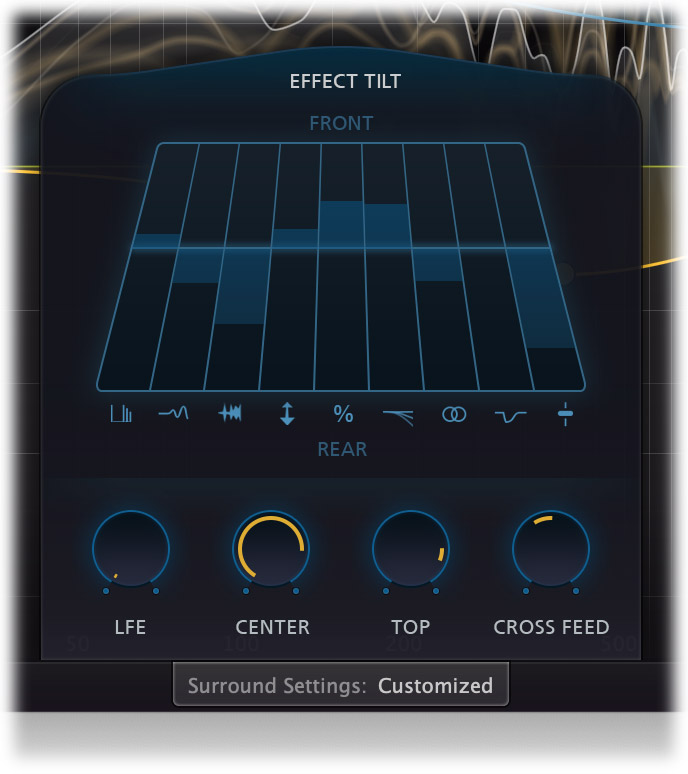
In surround mode, a Surround Settings button in the bottom bar appears and opens a panel of dedicated surround options. At the top of the panel, the Tilt Controller has a corresponding slider for every main control at the top of the interface. Using this, you can tilt the behavior of the knobs in an immersive layout. Moving a tilt slider up means more at the front, less at the back, and vice versa moving it down.

So for example, if you'd like the reverb to be brighter at the front of the room, but longer in the back, then adjust the Brightness Tilt slider upwards, and move the Decay Rate Tilt slider down. Experiment with all the tilt sliders to get a good feeling of how you can affect the immersive experience. While you move the mouse over the tilt sliders, the corresponding main controls are highlighted so you can easily identify how they are related.
At the bottom of the panel, LFE, Center and Top knobs adjust the wet mix level of these speakers. By default, the LFE channel is left completely dry. The levels can be attenuated, but can also be boosted. Adjusting the Top level in an Atmos layout affects the surround versus immersive feeling: when set low, you get the classic surround effect, but when set higher, you become more and more part of the immersive sound.
The Cross Feed knob controls the amount of cross feed between the different speakers and speaker pairs (e.g. 'Center' or 'Surround Rear') of the channel layout. If set to 0%, every speaker pair operates independently from other speaker pairs. It defaults to 100%, resulting in a very natural sounding, immersive reverb effect.
Next: Impulse Response import
