Have you ever noticed how difficult it can be to find the right level for bass frequencies in a mix? Or how our perception of this changes with monitoring level? Why is this so much harder for us than it is for relatively high frequencies? Part of the issue can be associated with monitoring systems and acoustics, but there is another critical factor at play: psychoacoustics, or how the human ear perceives sound. Having a bit of knowledge about how our auditory system works can really help you as a mix engineer since every decision we make is impacted by our perception of sound.
How do we perceive frequencies?
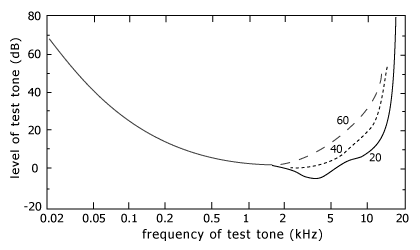
Everyone hears sound a little differently. One way we measure an individual's hearing is with a test called an audiogram. During an audiogram, test tones at various frequencies are played at different levels and the person being tested indicates whether they can hear the tone or not. Although the results will vary slightly from person to person, over the course of many studies we have been able to plot an average curve that describes all of us in a general way.
At best, we can hear frequencies between 20 Hz and 20 kHz but within this range we don’t perceive all frequencies as being equally loud. In general, we're more sensitive to upper midrange frequencies, with the highest sensitivity being in the 2kHz-4kHz range. This frequency response curve also changes depending on the overall amplitude level of the sound; at higher amplitudes we perceive frequencies more equivalently than at lower amplitudes.
The way our ear works affects the way we perceive the music we produce and listen to.
In general, we are not very sensitive to low frequencies. In the above graph this is visualized as a steep slope between 20 and 50 Hz. Frequencies in this range need to be much louder than higher frequencies in order to be perceived as being the same loudness.
We can also see that the frequencies we are most sensitive to fall somewhere between 2 and 4 kHz. This particular range corresponds to the resonance of our auditory canal. This may have come about as an evolutionary development as this is an important frequency range for stimulus such as human speech, the cry of a baby or the sound of a sabre-toothed tiger stalking you from the shadows.
How we perceive the highest frequencies changes as we age. Due to the design of our inner ear, we tend to lose high frequency sensitivity as we get older. The graph above indicates this as well, displaying data for ages of 20, 40 and 60 as alternative high frequency curves.
What makes things really interesting is that the frequency response of our auditory system also differs depending on amplitude. The following graph shows a similar set of curves to the last graph, but with multiple curves. These are called Equal Loudness Contours.
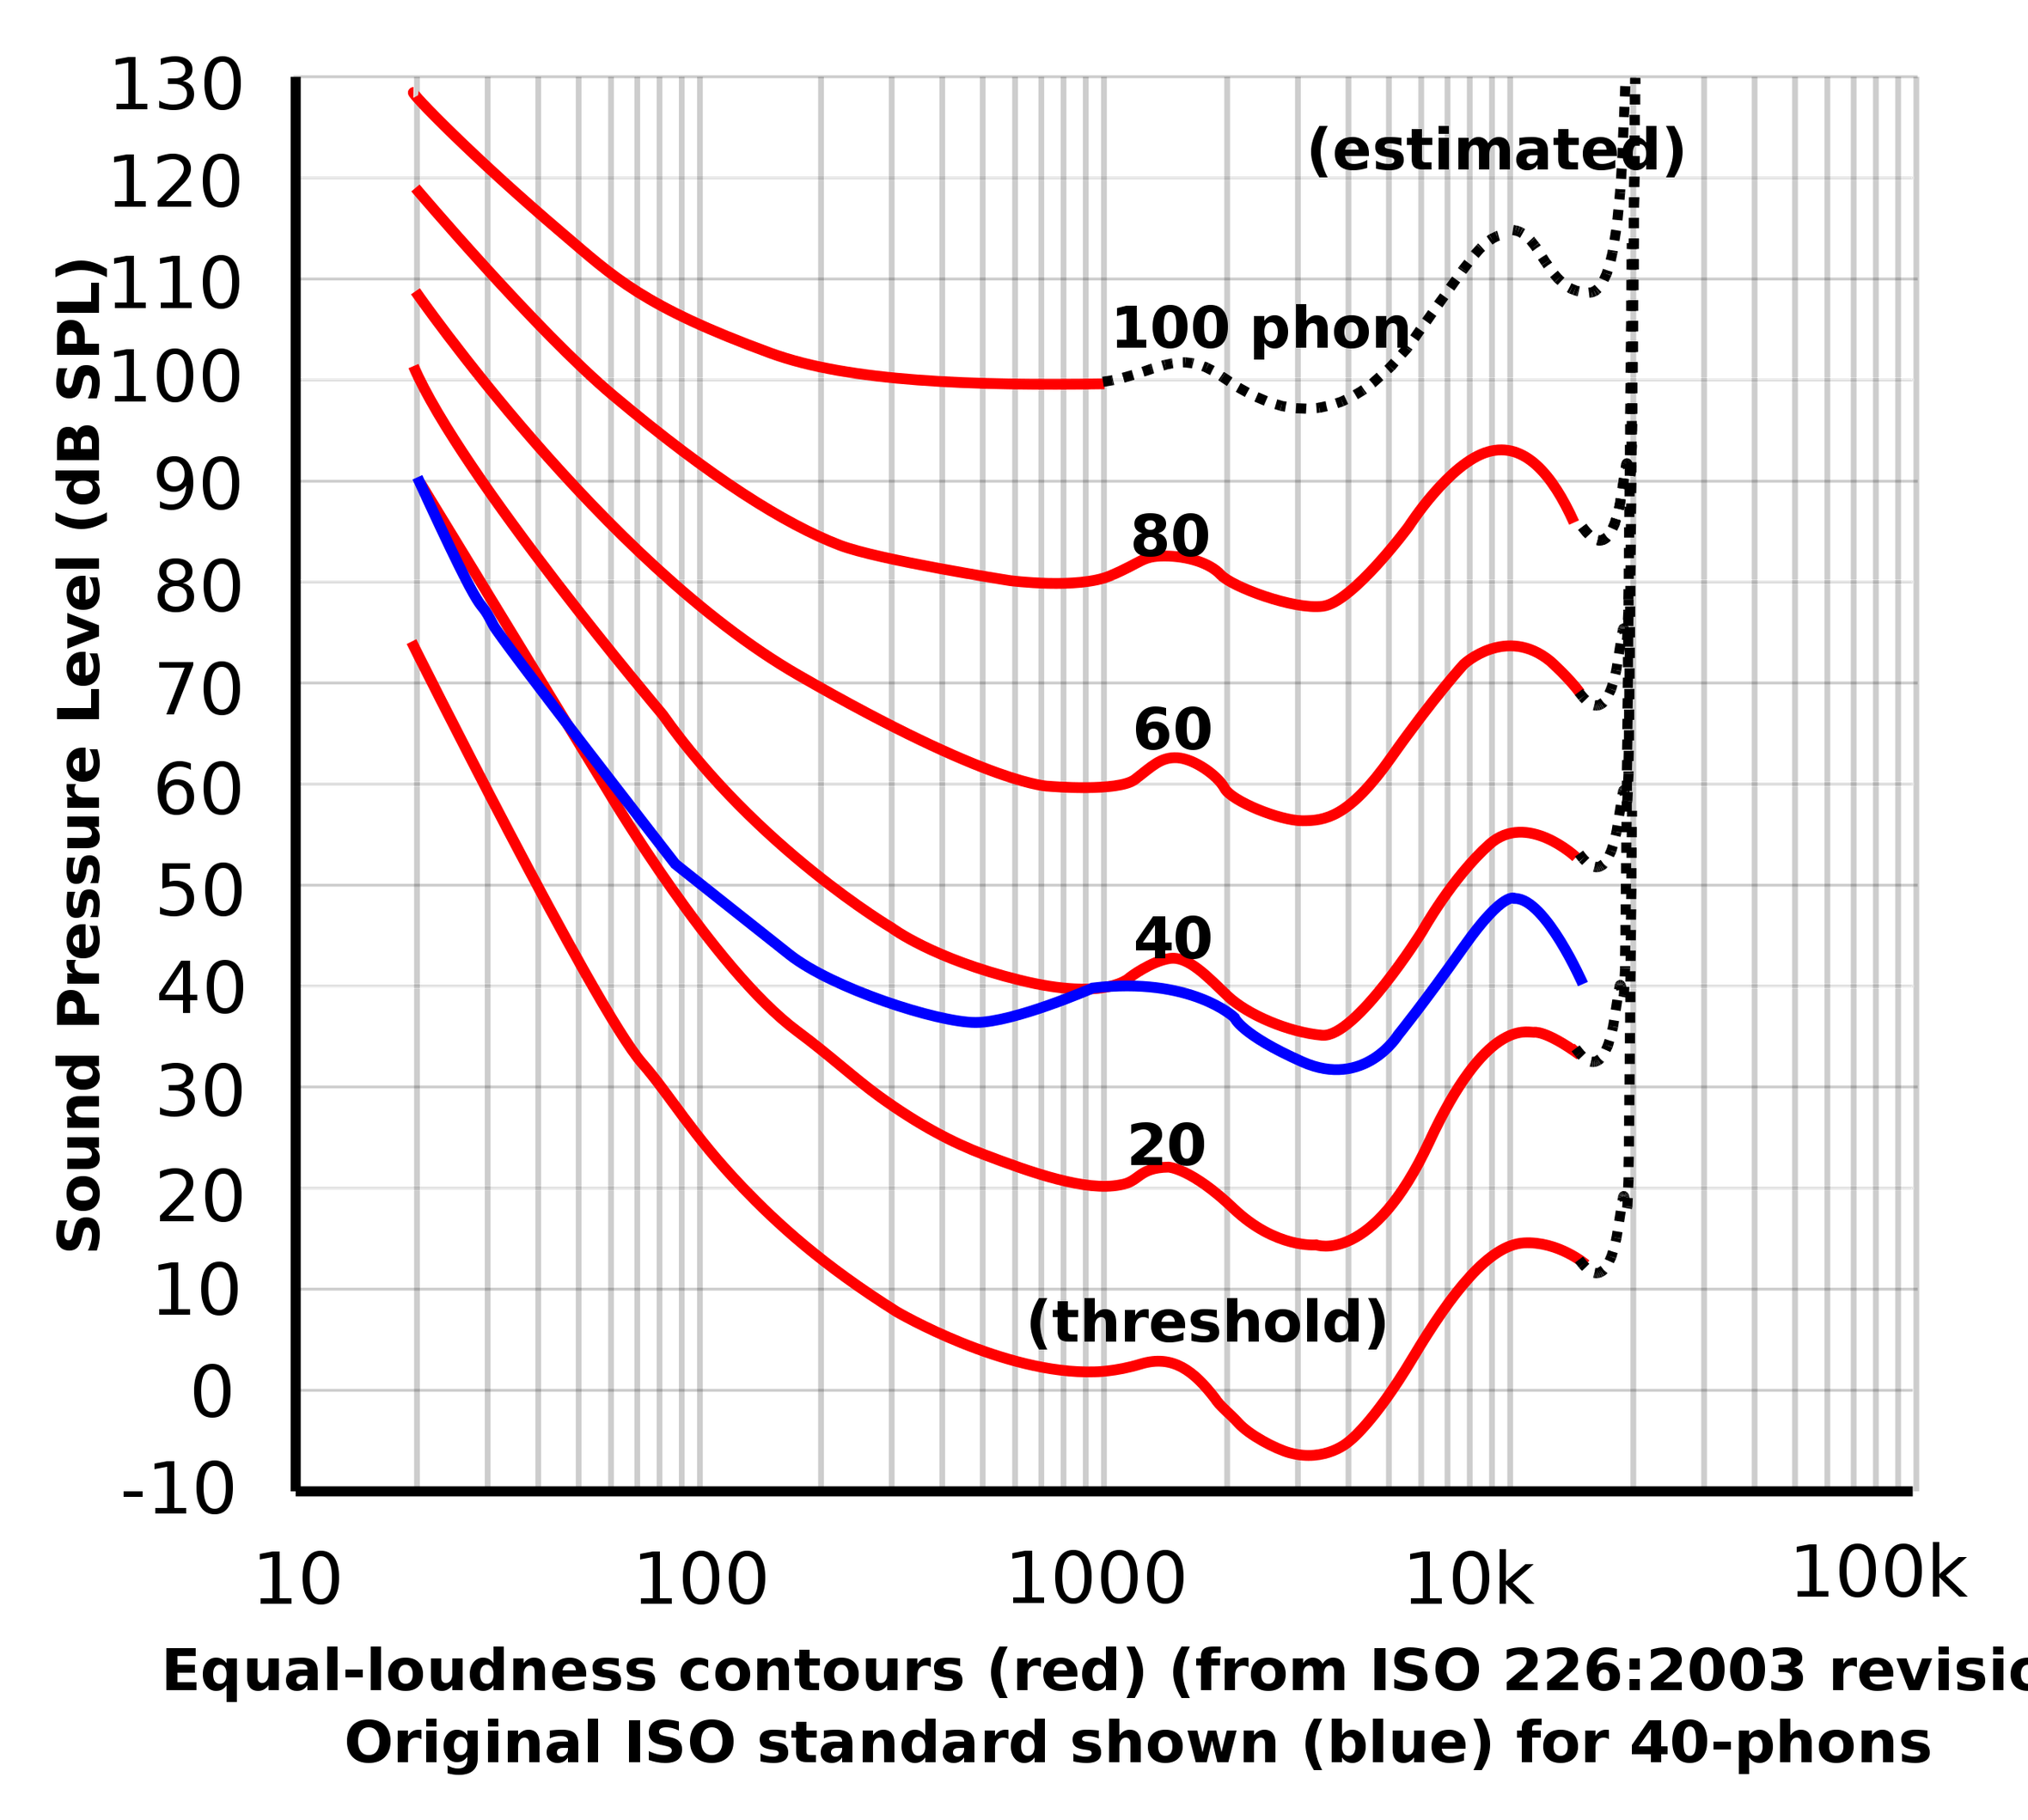
This graph, like the previous one, shows that we are much less sensitive to low frequencies than high frequencies. However, it also reveals that as things get louder this difference becomes less pronounced.
This sheds some light on why we tend to subliminally favour loud music; we perceive more spectral information when things get loud, particularly in the bass department. This is also the reason you might see a 'loudness' button on some home stereo units. This feature is meant to be used when listening at low volumes and adds high and low frequency emphasis to compensate for our lack of sensitivity at low levels in these areas.
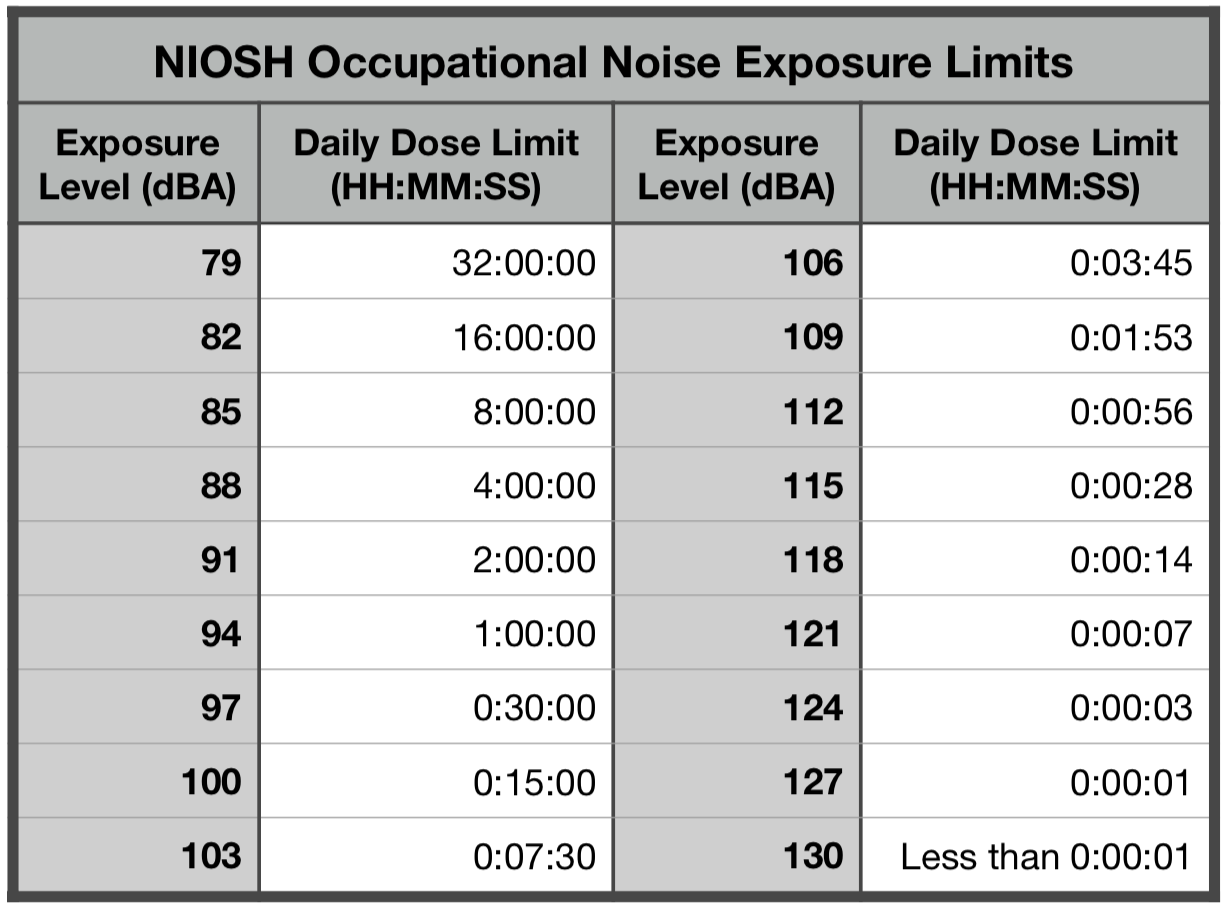
These graphs can help inform some best practices for monitoring a mix. It is common practice in a professional studio to establish preset listening levels for monitoring, often in the 76-84 dB range. In a perfect world, we would monitor at even louder levels because our ears would have the flattest frequency response. However, too much time spent listening at loud levels results in hearing damage over time. For this reason we need to find a sweet spot; loud enough for the ear to trend towards a flat curve, but quiet enough so we can work in this environment day after day. Additionally, consistently monitoring at the same level allows us to evaluate the overall spectrum of our mix. As an example, we can't accurately evaluate whether a mix has the right amount of low end if we are constantly changing the monitoring level and thus altering how sensitive we are to those frequencies.
Masking
To produce the above graphs, subjects were presented with one frequency at a time as a stimulus, but music is a far more complex signal with many frequencies present at the same time. For this kind of stimulus, there are additional psychoacoustic processes at play.
Frequency Domain Masking
When two frequencies close to each other are presented to a listener at the same time, one has the potential to mask the other, making it more or less imperceivable.
For this kind of frequency masking to take place, the two frequencies must exist in the same frequency region. You can think about it like a set of bandpass filters dividing the audible frequency range into different regions. Our ear processes frequencies in a similar way. In the study of psychoacoustics these regions are referred to as "critical bands". Studies have shown that lower frequencies tend to mask upwards more easily than high frequencies can mask those below. This effect is even more pronounced at higher levels.
Time Domain Masking
The previous masking examples assume that the two frequencies are being played simultaneously, however masking can also occur even when this is not the case. If two sounds are presented close enough in time to one another, they also have the potential to create a masking effect. As with simultaneous masking, this effect is more pronounced the closer the two frequencies are to each other. Forward masking refers to a sound being masked by another which immediately preceded it. Backwards masking describes the potential for one sound to essentially make us forget that we have just perceived another, with the masking tone actually coming after the tone being masked.
Putting it to Use
When you’re mixing, understanding these concepts i.e how we perceive frequencies and loudness is important for a couple of reasons:
- Establishing consistent monitoring levels can help with critical evaluation. You don't need to be in a big budget studio to use this to your advantage. Invest in an SPL meter, or even an app for your phone and measure the levels you are working at. Find the sweet spot where you can optimize both your ear's frequency response and your exposure to sound. Make note of the volume setting on your monitoring device that gets you to this level, and perhaps even set it as a preset you can return to if possible. Most importantly, be aware of how this level impacts your judgement.
- It can help you to get the midrange right. Monitoring at lower levels or on smaller speakers means we perceive less low frequencies, exposing the midrange which is where many critical sound sources live. For this reason, it can be good to check in on your mix from time to time at lower levels. Just remember, you are not supposed to hear lots of low end in this scenario. Check your low end on full range speakers and at louder overall levels.
- It can help with panning decisions. Consider how the arrangement of your track and the stereo location of sound sources may contribute to masking. If you want sounds with similar frequency content to stand out without being masked, consider placing them further apart on the sound stage.
- It can help when refining the settings for time-based effects. In dense mixes, sometimes reverb tails can be masked by other sources, making it difficult to establish environmental cues. In this case, consider trying a delay instead as this can result in a similar feeling of space around a source without being as easily masked.
- It can help explain why two instruments, though they may meter similarly in a DAW, won't necessarily be perceived as being the same amplitude.
- Monitoring at higher levels produces a more even frequency response for our ears, but keep in mind that it may also mean more masking is occurring.
- Loudness and masking factor in when working on individual tracks as well. When applying EQ to a sound source, it is generally a better approach to apply it subtractively rather than additively. For example, if a sound is dark, consider cutting unnecessary low end (which may be causing masking in neighbouring higher frequencies) before boosting high frequencies. FabFilter Pro-Q 3’s auto-gain feature is a useful tool in this situation as it will compensate for the drop in level when you’re cutting frequencies.
Understanding how sounds fit together is a critical skill for a mix engineer. Since we perceive sounds differently in isolation, there’s no use in making all of your EQ decisions by soloing tracks and applying EQ in isolation. Surely, you can use the solo button temporarily to focus on a specific region, but listening to solo-ed tracks through prolonged periods of time is likely to draw you away from the music and put you into a micro-focus, so approach those solo buttons with caution and watch your monitoring levels!

